1. What is an Unnatural Link
As it is presented in the Google Webmaster Guidelines, any link that intends to manipulate the PageRank, or the search engine results, no matter if there is a link to your site or an outgoing link from your site, is considered an unnatural link. Additionally, creating links that weren’t editorially placed or vouched for by the site’s owner on a page, otherwise known as unnatural links, can be considered a violation of the Google Guidelines.
Unnatural links may also be found under the following synonyms:
- inorganic links
- toxic links
- low quality links
- artificial links
- manually created links
- deceptive links
- manipulative links
- impact links
Unnatural links are considered to be a violation by Google’s Guidelines, thing that may lead to penalties. A penalty can be manual or algorithmic.
If your site has received a manual penalty, you’ll be notified of it via your Google Webmaster Tools account. If your site has received an algorithmic penalty, you won’t received any notification of it from Google, however, an instant, significant and long lasting drop in rankings and traffic is a clear indicator that your site has been hit with an algorithmic penalty.
Manual penalties occurs when someone from Google has manually reviewed a site and observed that the web page violated one or more Google’s guidelines. Algorithmic penalties occurs when an activity from a site sparked a trigger on Google’s algorithm. Here you can find a more in-depth article about the definition of an unnatural link.
2. Unnatural Link Types
Some of the most common unnatural links, according to Google’s Guidelines are:
- Any link that is generated due to a payment in money
- Any link that is generated due to an exchange of goods and services
- Links that are widely distributed in the Footer of a page or on the blogroll
- Any link that is a result of a “link to me and I’ll link to you” campaign
- Links on Low-Quality Web-directories or Bookmark sites
- Links with optimized anchor text (articles, press releases etc)
The list mentioned above is not a complete list with all the possible unnatural links. Is just an indicative list that may guide you in identifying the most common unnatural link issues. Here you can find a more complete list.
3. When do You Need to Use the Unnatural Link Detection Tool?
The unnatural link detection tool is a great asset that you should use in order to be aware of your site’s or your competitor’s link profile Google Penalty Risk. Furthermore, the unnatural link detection tool is the ideal widget if:
- You’ve received an unnatural link warning.
- You’ve been penalized by Google (algorithmically).
- You think you are suffering from a negative SEO attack.
- You want to manage the risk of being penalized in the future for unnatural links.
The unnatural link detection tool can really make a difference in terms of efficiency, whether you are a webmaster or an agency who is working with multiple sites. Here are just some of the things the unnatural link detection tool can help you with:
Webmasters
- Improve the problematic site
- Work on creating more quality content
- Create better Link Building Strategies
Agencies
- Get more client work and do it in the same time frame
- Be more competitive on the market
- Increase Your Profit by getting a much better ROI on Unnatural Link Pitches and Client Work.
4. Quick Overview
The unnatural link detection is a very complex system, that was highly simplified to be as straightforward as possible for our users. This widget brings lots of benefits in terms of link profile management and it will save you lots of time.
Is important to know that the unnatural link detection tool shows only live links. Lost links (the links that don’t exist anymore) have no value in terms of being disavowed or removed. For all the classification, a very complex algorithm is applied to each relationship that is found in a site’s link profile. Based on the classification that is done in the Brand vs Commercial Anchor Text and using more than 50 rules, our widget is specially designed to detect both unnatural links, suspect and ok links. Putting it simply, this widget helps you find out where your links in the link profile are fitting. It’s important to know that the classification is automatically done by advanced algorithms and doesn’t have any human intervention. If you consider that a particular classification is done inaccurately, you have the possibility to reclassify that specific link.
Any system has a false positive ratio. Yet, our unnatural detection algorithm has a very low false positive ratio. We permanently upgrade our tool, adding more rules to our algorithm in order to give you the best results.
Here is a video tutorial on how to use the Unnatural Link Detection Tool. You can also find the video here.
5. Unnatural Link Detection Widget
Overview
Anchor Text Classification

In order to use the Unnatural Link Detection feature you need to specify the anchor text distribution for your site. To do so, you need to go to the Anchor Text Distribution & Classifier. Here, you’ll have to identify and classify your brand, commercial and miscellaneous anchor text keywords. More details about the anchor text classification can be found here.
Unnatural Link Detection Steps
 The Unnatural Link Detection Toolbar is designed in order to ease the pain of disavowing links. There are 3 buttons which correspond to 3 easy steps in the disavowing process: The Unnatural Link Detection Toolbar is designed in order to ease the pain of disavowing links. There are 3 buttons which correspond to 3 easy steps in the disavowing process:
|
Buttons on The Toolbar
| – Button used to launch the Unnatural link Navigator. | |
| – Button used to export a disavow file in .txt format. In front of the button you have a message that displays the number of domains or links marked for disavow. | |
| – Button that opens the Disavow Tool from Google Webmaster Tools. | |
| – Button that opens the Support Documentation. | |
| – Button that sends you to our blog archive of articles and case studies that are related to unnatural links. | |
| – Button that sends you to the Anchor Text Distribution & Classifier feature. | |
| – PDF Export. | |
| – CSV Export. |
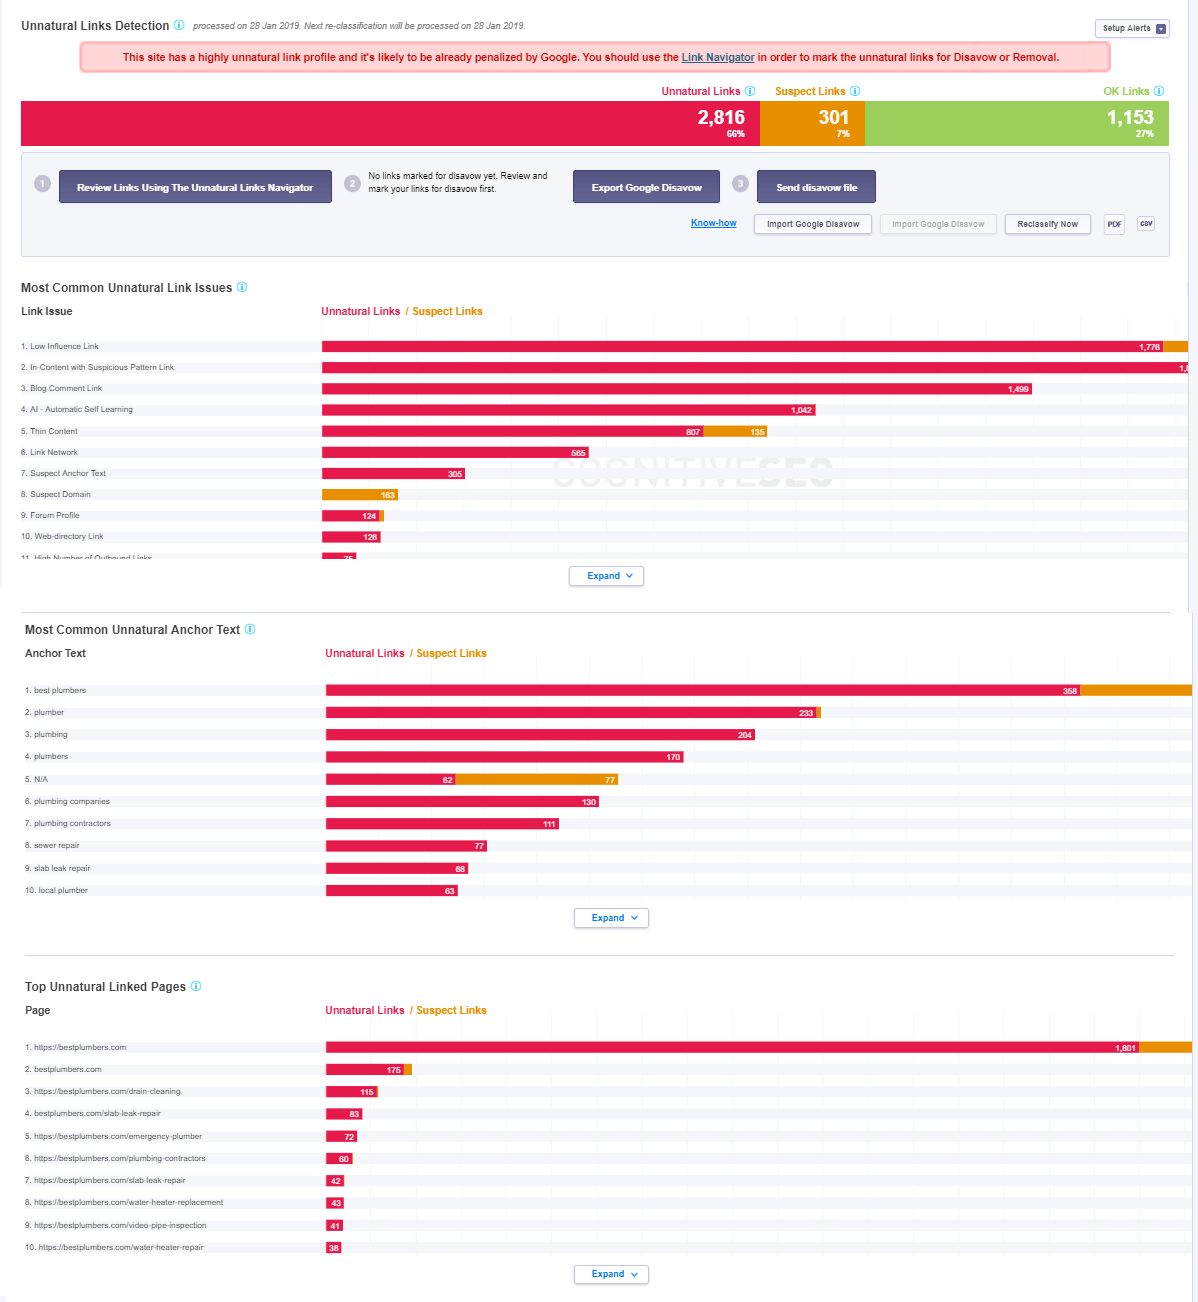
You may have:
- Unnatural Links – links that are identified as violating Google’s Webmaster Guidelines.Link Distribution Chart This chart gives you an overall idea on how is your site affected by unnatural links.
- Suspect Links – classified as potential unnatural links. You should carefully check these links in order to mark them as unnatural or OK.
- OK Links – these type of links are within Google’s Webmaster Guidelines.
Managing The Disavow File  1. Import Google Disavow
You have the possibility to import a Google Disavow File. The links form the imported file will be added in our system and they will be automatically tagged as “Disavowed”. Therefore, if you already have a disavow file you want to add new links to, you can simply import that file, continue disavowing other links/subdomains/domains and when you’re done with the process you can export a disavow file that will contain your previously disavowed imported links and the one that you’ve just added. The next recrawl will maintain the “disavowed” tag to the links imported from “Import Google Disavow”. If you want to import a Google Disavow File that has already been successfully uploaded in your Google Webmaster Tool’s account in order to ignore those links into the analysis, use the Ignore feature.

2. Create The Disavow File
To create a list with the links that need to be disavowed you must decide which should be tagged for disavowing first. To do so, click on the Review Links Using the Unnatural Links Navigator button. You can access the Unnatural Link Navigator in order to review the links that should be disavowed. Here you can apply the “Disavow” tag in order to add the individual links or domains to the the disavow list. ![]() 3. Export The Disavow File
3. Export The Disavow File
Once you finalized the review process you should use the Export Google Disavow button, to generate a .txt file that contains the list with all the domains and links that you have marked for disavow. This file is already formatted to be imported into the Google Disavow Tool from Google Webmaster Tools, without the need of any additional edits. 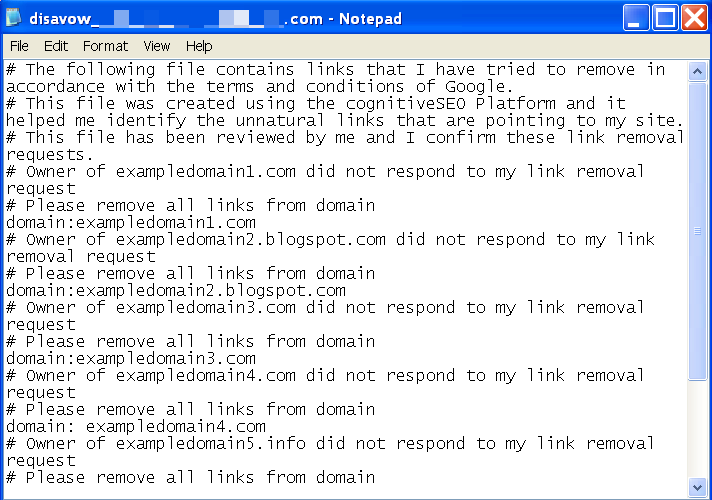 4. Send The Disavow File
The Send Disavow File button is a link that sends you to the Google Disavow Tool from Google Webmaster Tools. There, you’ll be able to upload the file that was generated previously. 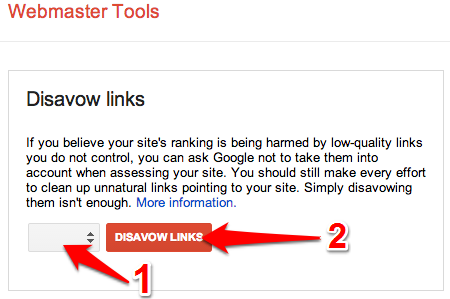 Step 1 – Choose your website.
Step 2 – Click on the “Disavow Links” button.
Step 3 – Click on “Choose File” and select the .txt file you’ve created at the “Export Google Disavow” step. Then, you need to click Submit. If you’ve successfully completed all the steps you should see this message: “Results for the submission on …, 2014 … PM .You successfully uploaded a disavow links file (disavow_example.com.txt) containing X domains and Y URLs.”
Google Indexation & Malware Check
What is the Google Indexation & Malware Check?
An added feature for the Unnatural Link Detection tool that delivers accurate data about the status of domains and subdomains. This feature was added in order to provide users with in-depth & accurate information regarding their unnatural links. cognitiveSEO users can use the information to identify possible sources of unnatural sites that were already penalized by Google, shady websites, or malware websites that link back to your site.
 This feature is composed of two major parts:
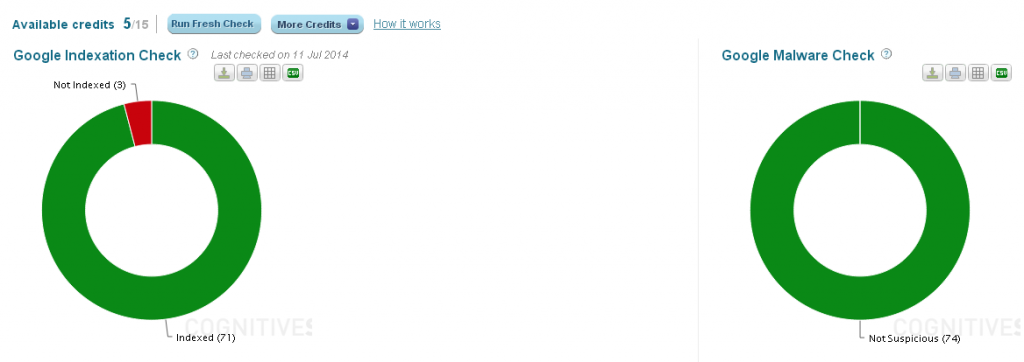
- Google Indexation Check – displays a doughnut chart with a breakdown of linking subdomain indexation status. You can see two types of data:
- Indexed – displays the number of subdomains that are indexed successfully in Google.
- Not Indexed – displays the number of subdomains that are not indexed by Google.
- Google Malware Check – displays information regarding subdomains identified as malware. You have two types of data:
- Malware – displays the number of subdomains that contain malware.
- Phishing – displays the number of subdomains that contain phishing.
- Malware and Phishing – displays the number of subdomains that contain both malware and phishing.
- Not Suspicious – displays the number of subdomains that did not trigger any red flags to the Google Malware Check.
The advantage of using this feature is that the newly created data are integrated in the data already displayed in the Unnatural Links Detection tool. As a result, we will be able to provide you with more accurate information regarding the unnatural links pointing to your website.
What are Google Indexation Credits
In order to use the Google Indexation & Malware Check you need “Google Indexation Credits”. One credit accounts for a check on both indexation and malware for 1000 live linking subdomains. So if you have a link profile containing 3000 live linking subdomains, you’ll need 3 Credits to perform one check. They are included in the Premium & Elite plans as following:
- – 5 Credits included in the Premium plan.
- – 15 Credits included in the Elite plan.
The credits are reset every month on the billing day. You can also purchase extra Credits from within the tool by clicking on the “More Credits” button, placed on top of the feature. By clicking on the button, a drop down-menu will appear with the following options:
- Buy 10 credits – 75$ – One time payment
- Buy 25 credits – 175$ – One time payment
- Buy 50 credits – 300$ – One time payment
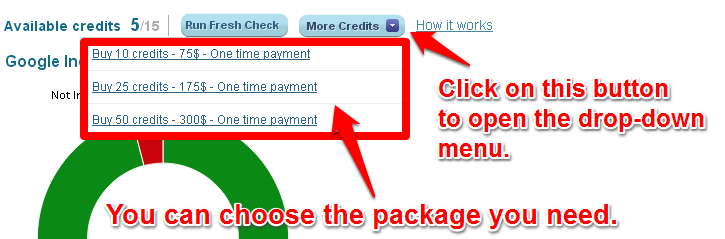 These credits will be added to your already available credits, and they will be displayed in the “Available Credits” section of the feature. One Time Payment Credits Do not Expire and Are not Refreshed Every Month.
 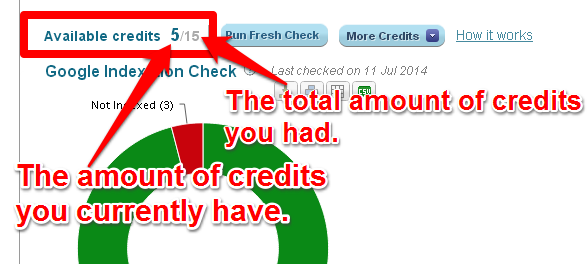 How to Run a Google Indexation Check In order to run a Google Indexation Check you’ll need to be sure you have the right amount of credits available to perform the process. If you don’t have enough credits to perform the check you will be prompted with a message box. Once you have the required number of credits to perform the Google Indexation Check, you can click on the “Run Fresh Check” button.
 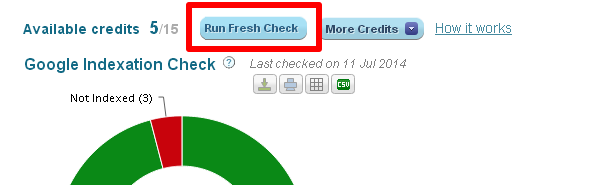 Next, you will be prompted with a message box that displays the total amount of credits that will be consumed if you perform the check. If you wish to go further, you will have to click on the “OK” button.
 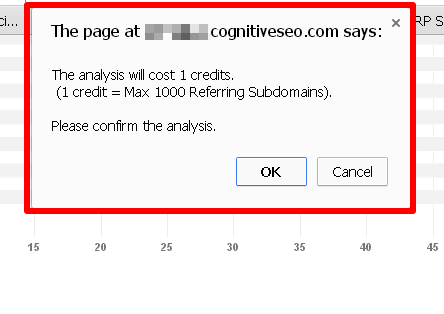 Once you’ve performed the check, the amount of credits needed for this action will be deducted from your total remaining amount, and the available amount will be recalculated. Also, you’ll have a record of the last time you’ve performed a check, near the Google Indexation Check title.
 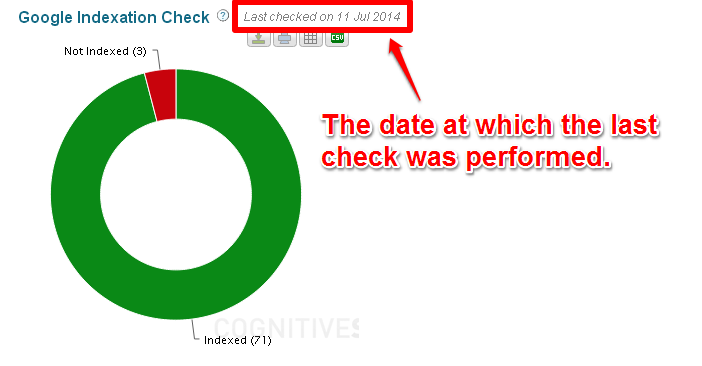 Chart buttons
| – Button to switch between table and chart view. | |
| – Button to export data to CSV format. | |
| – Button to download the chart in a PNG, JPEG, PDF and SVG format. | |
| – Button to print the chart. |
Exporting a PDF Report
| This button helps you generate a PDF file with an analysis of your website’s links profile. The PDF report will look like this: |
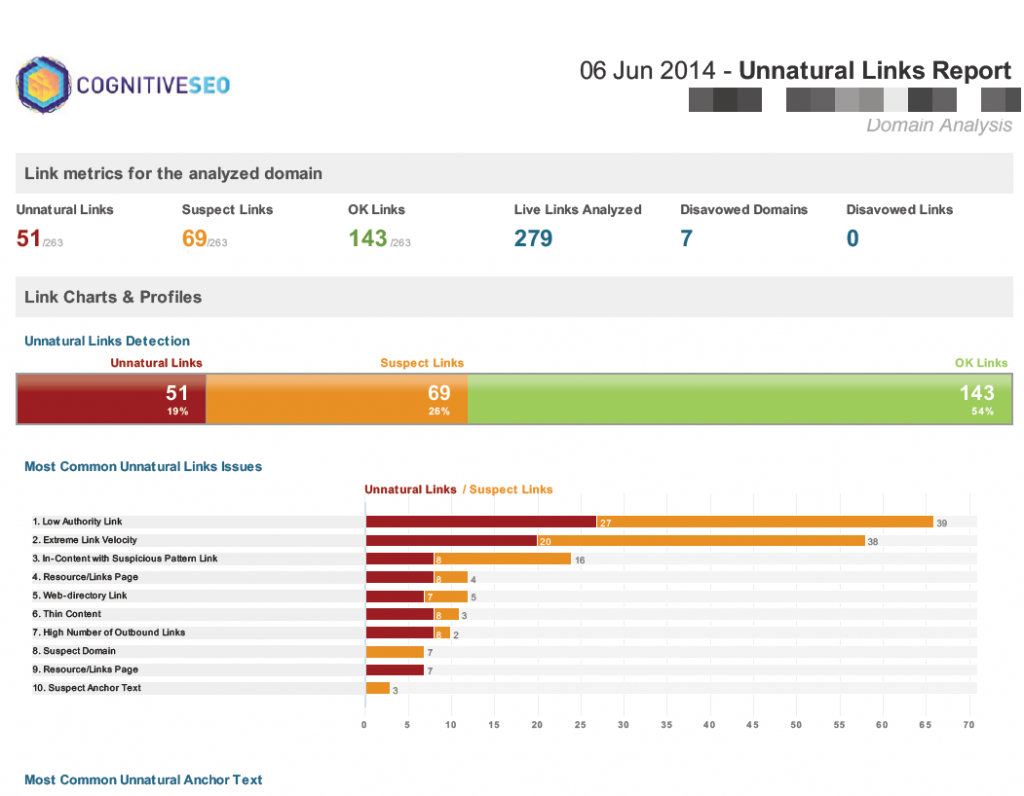 The PDF reports can be white-labeled if you go to the Settings are of the account and select the appropriate options there.
Reclassify
You have a button that sends you quickly to the Anchor Text Distribution & Classifier feature. This is very helpful when you want to re-classify the anchor text keywords. ![]()
Link Profile Charts
These charts were added in order to help you read the data about your unnatural links more easily. They help you understand the information regarding the unnatural link issues, common anchor text keywords, pages with unnatural links pointing to them and the time evolution of unnatural, suspect and OK links.
1. Most Common Unnatural Link Issues – This chart displays a top with the most common unnatural link issues that our tool identified when it crawled the site. These are all motives for which the links were tagged as unnatural or suspect. Reading the data displayed here may give you some insights regarding the Google’s Guideline violations that were made. The number that is taken in consideration for each issue is a sum between the unnatural links and the suspect ones that were identified for that issue. 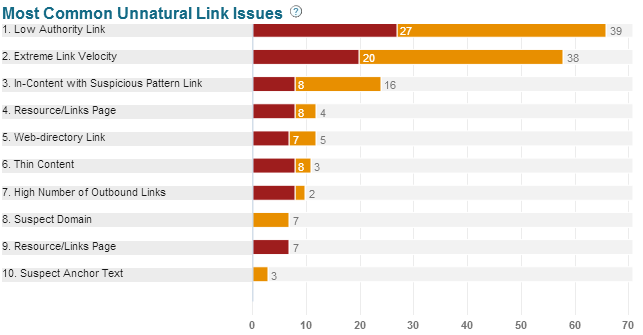
2. Most Common Unnatural Anchor Text – This chart shows you a top with the first 100 anchor text keywords that were used on the unnatural links pointing to the site. If the website has an anchor text list that contains more than 100 anchor text keywords attached to unnatural or suspect links pointing to your site they will be displayed in the CSV export. 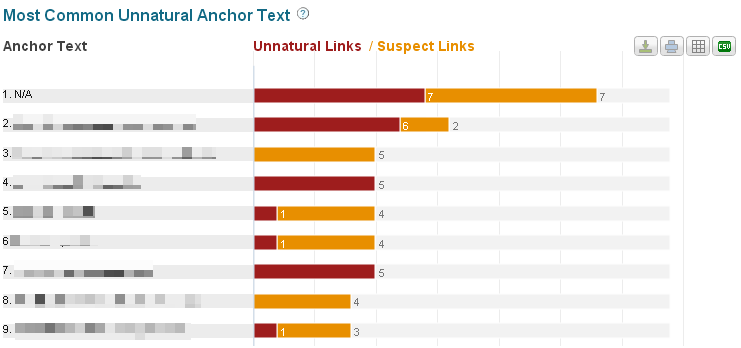
3. Top Unnatural Linked Pages This chart is a top with the pages on your site that have the most unnatural or suspect links pointing to them. This top includes only the first 100 pages. A list with all the pages is included in the CSV export. 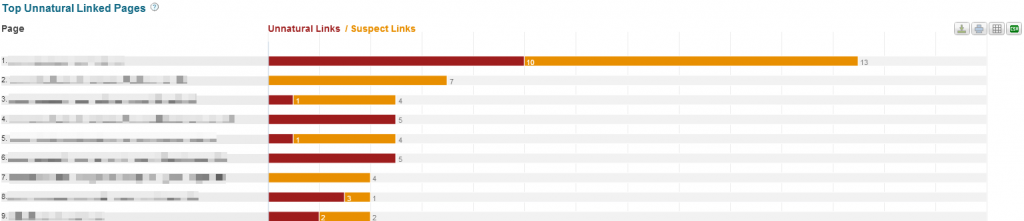
4. Unnatural Link History This chart displays a weekly evolution of the Unnatural, Suspect and Ok links for the website. This chart is displayed only if you’re running a Recurring Campaign for your website.
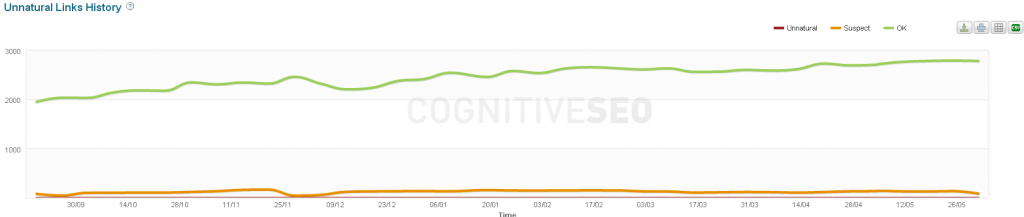 Chart Buttons
| – Button to switch between table and chart view. | |
| – Button to export data to CSV format. | |
| – Button to download the chart in a PNG, JPEG, PDF and SVG format. | |
| – Button to print the chart. |
6. Unnatural Link Navigator Messages
The Unnatural Link Detection Tool identifies three type of link profile risks, depending on the links’ naturalness. 1. Green – This notifies the user that you have a good looking link profile. The tool hasn’t detected any problems regarding the nature of your links. In order to avoid any problems you should keep an eye to see if this message disappears. ![]() 2. Yellow – This notifies the user that the crawled site has a suspect link profile and it requires a further analysis. The site might be penalized in the future (if it wasn’t already) if the issues aren’t addressed and resolved.
2. Yellow – This notifies the user that the crawled site has a suspect link profile and it requires a further analysis. The site might be penalized in the future (if it wasn’t already) if the issues aren’t addressed and resolved.  3. Red – This notifies the user that the crawled site has a high percent of unnatural links pointing to it and might already be penalized by Google. This requires an immediate analysis of your link profile with the Link Navigator, in order to remove or disavow the unnatural links.
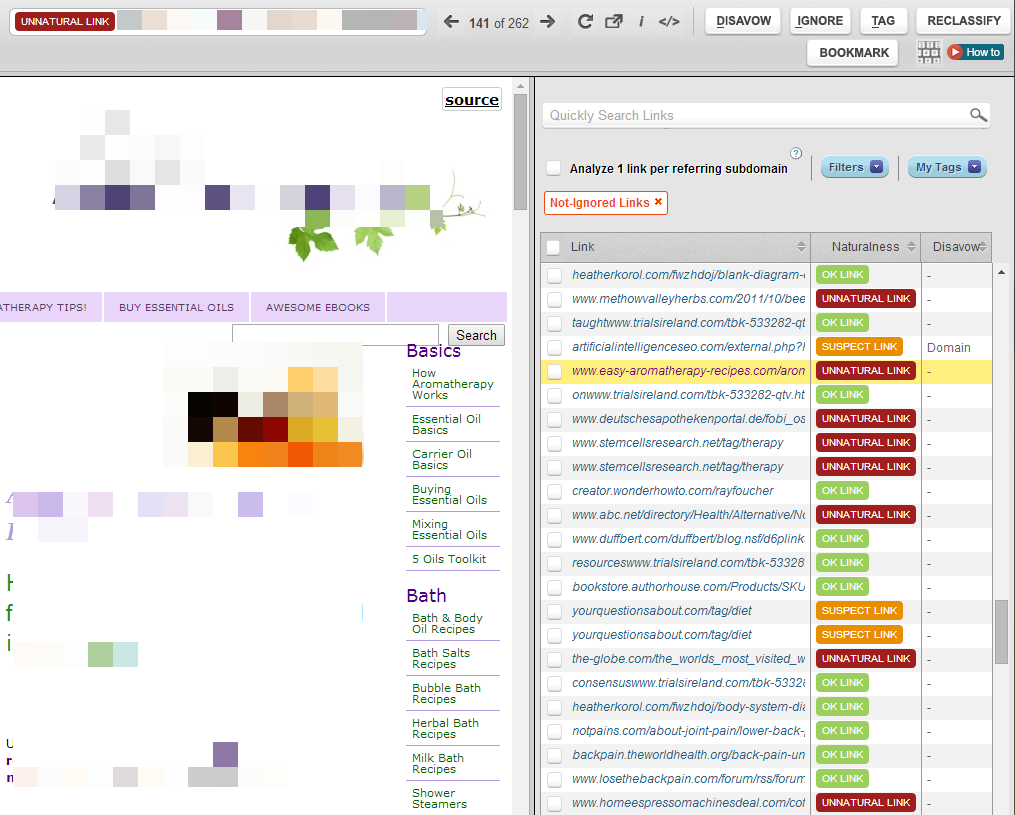
 ![]() The Unnatural Link Navigator allows you to quickly browse thousands of links at never seen speed. If you want to access the Unnatural Link Navigator you just have to press the“Review Links using the Unnatural Link Navigator” button:
The Unnatural Link Navigator allows you to quickly browse thousands of links at never seen speed. If you want to access the Unnatural Link Navigator you just have to press the“Review Links using the Unnatural Link Navigator” button:  This feature is great if you want to:
- Disavow, Tag or Ignore domains/links.
- Visually go through various links.
 Here are the most important features of the Navigator:
- Automatic Page Loading
- Instant Visual Preview of the Link
- Link Data and Actions
- Bookmarks, Tags and Filters
- Instant HTML Code Inspector – to see the where the link is in the code
- Keyboard Navigation for the quickest link profile browsing
- Full List of Links and Filters that you can apply
- Customizable Interface
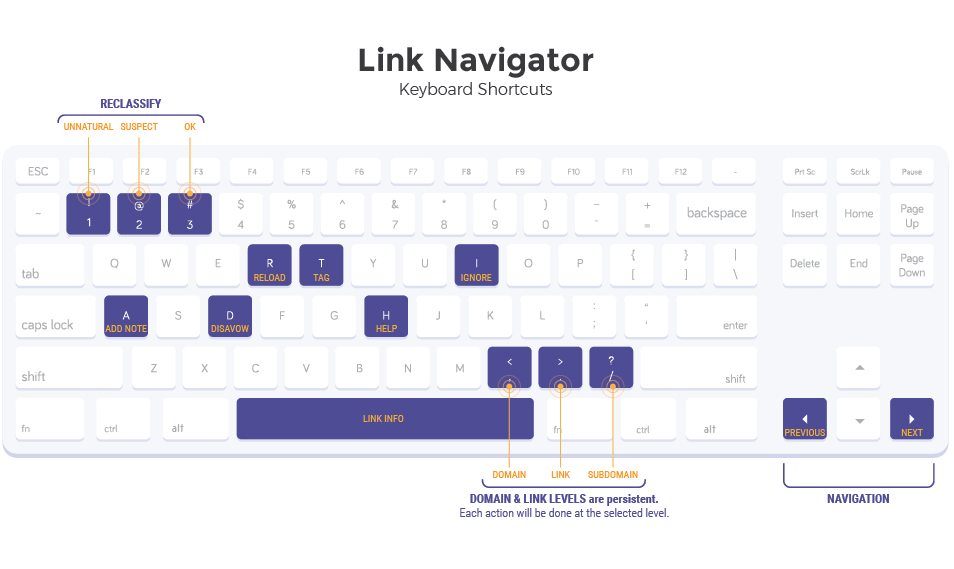
Keyboard Shortcuts
To speed-up the review process, even more, we give you the ability to navigate the link profile of the analyzed site, using keyboard shortcuts. Once you open the navigator, an image with the keyboard shortcuts will appear:
Toolbar Actions
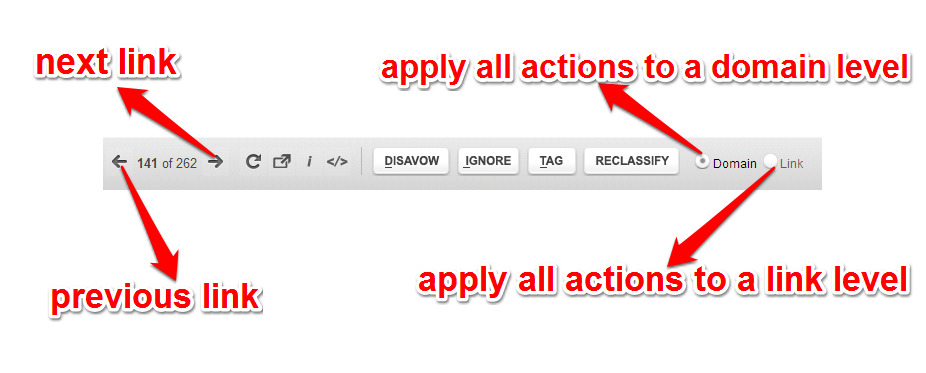
You can choose to use the shortcuts on the keyboard in order to manage your links but you can also do this by using the buttons placed at the top of the navigator, on the toolbar. You can also choose if you want your actions to be applied at a domain level or at a link level.
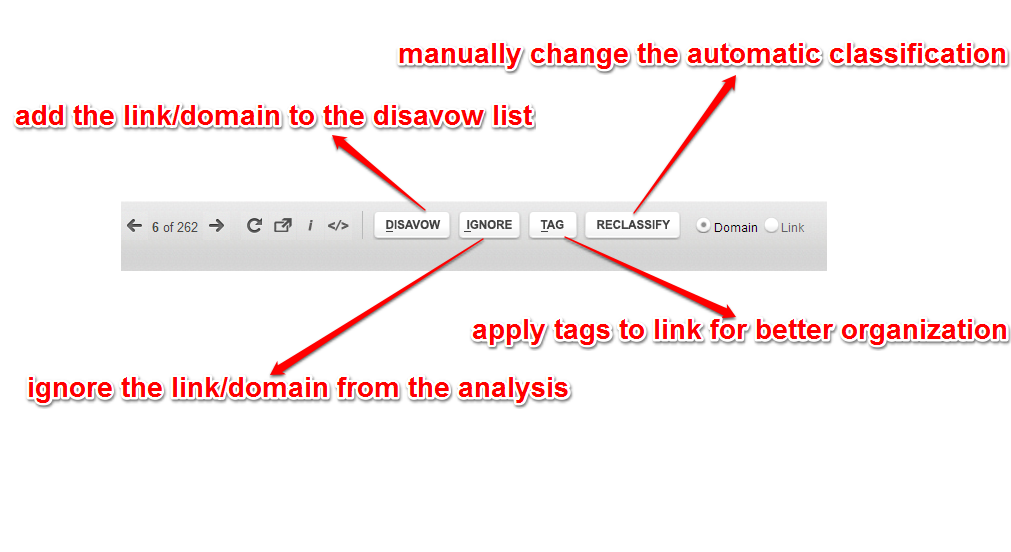
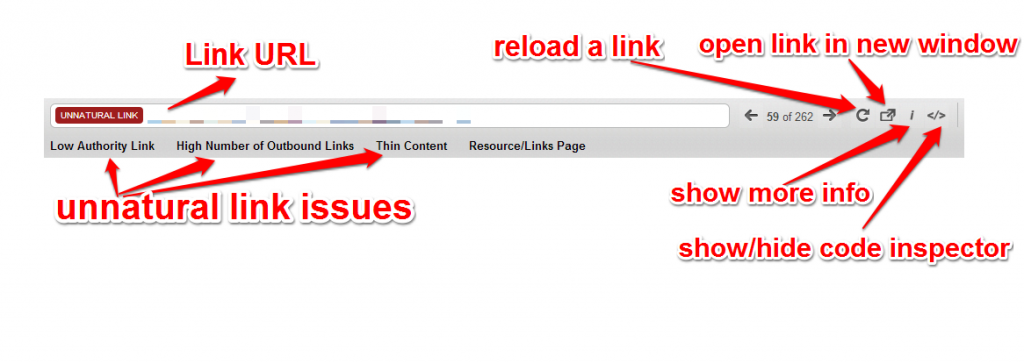
On the toolbar you are informed about the detected link type: unnatural, ok or suspect and also about the reasons why the link is considered to be unnatural or suspect.
The arrows from the top of the toolbar allow you to navigate to the next or previous link. The buttons on the toolbar also allow you to reload a link, to open a link in a new window, to show more info about the current link and to show or hide the code inspector.
Disavowing Domains/Links
Once you’re in the Link Navigator, browsing through the link list, you can disavow the links as shown below:
- You can use the Disavow button, from the toolbar.
- You should select the type of Disavow you want to do: at a Domain or Link Level.
![]()
- You can also use the “D” shortcut key for a much faster disavowing process.

- Or you can select multiple links and apply a bulk action.
Bulk Actions
The Bulk Actions feature is a great feature that allows you to apply bulk actions on several links all together. All you have to do is chose the links you want to take the action on by ticking the boxes situated in front of the links, click on the “Bulk Actions” select, choose the action you want to take, an then hit the “Apply Action”button.

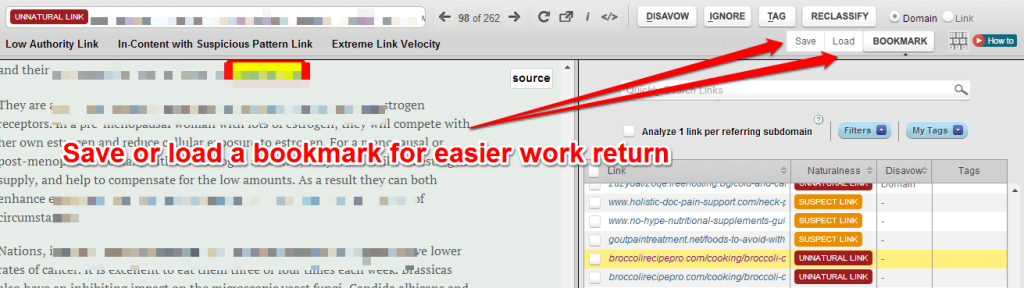
Using Bookmarks
When you are working on bigger projects and you are dealing with thousand of links, it is very likely that you are going to divide your work amount throughout several days. Every time you launch the navigator it is highly important to know what your work status is and continue from the point you left it. To do that, we offer you the possibility to save a bookmark. Hit the Save button every time you want to exit the navigator and press the Load button every time you want to start working again from where you last finished.
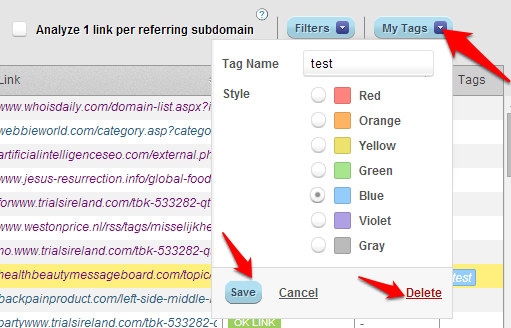
Placing Tags
For a better management, you can apply tags to your links. For a better organization, you can give custom names to each tag and you can also choose a different color for them. The tags are used when you want to make specific notes about the links you are investigating. You can later filter by the tags that you applied.
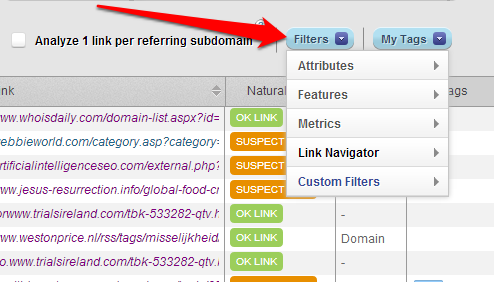
Using Filters
Every time you’ll visit a link, its color will change so you can easily identify which links you have already visited. Also, with the filter function you can filter the list of links you are looking at, just the way you need it . You can choose to filter the links by different attributes, features, metrics, link navigator options and you can even save custom filters in order to reuse them later. You can find out about the in depth functionality of each filter here:
Edit Columns
The link navigator allows you to customize the interface so that it responds as best as possible to your needs. You can choose which columns you want to be displayed on the navigator by pressing the “Edit Columns” button. Here you have the possibility to see all the columns or to choose which individual columns you want to be visible. After each change you make, you have to press the “Save” button. Also, you have the possibility to press the “Reset to default” button and only the “Link”, “Naturalness” and “Disavow” columns will be visible.

